Hello, and welcome to a tutorial on filtering and understanding sound using Fourier Transforms! While this tutorial will use Adobe Audition(TM), everything shown below can be done similarly using free software.
Fourier Transforms are vital to high-quality sound production because they can show how much of each frequency is contained in a sound. Very similar to some exercises in ECE 301, this tutorial will let you analyze visual Fourier Transforms, intelligently apply frequency filters, and gain a better understanding of some of the many applications of this topic. If you wish to download my sample files and follow along on your computer, they may be found below.
Sample Files
Let's get to it!
PART I
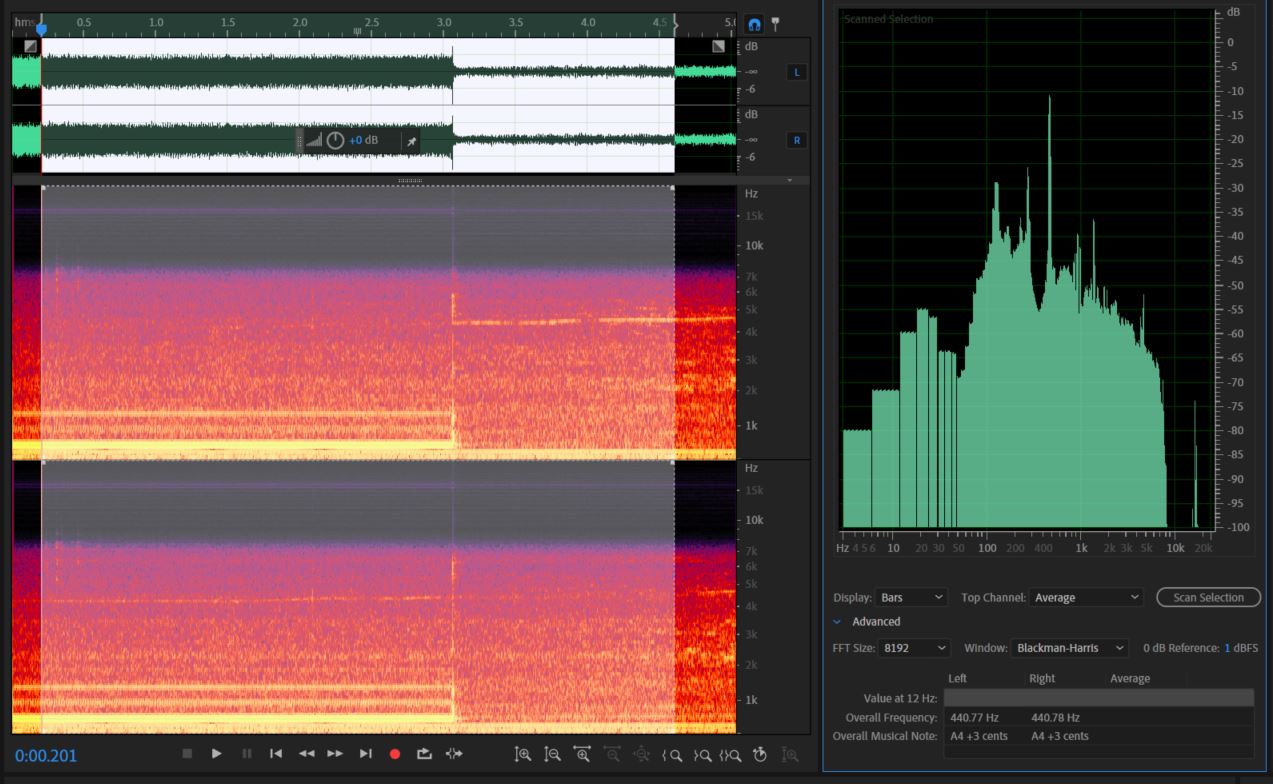
First, we are going to open up the file Dirty_A440.wav. This file contains a computer generated 440 Hz signal, recorded in a noisy room.
If you are following along with Audition, you are going to want to hit Alt + Z to enable your Frequency Analysis window. Once you do that, go ahead and select your entire signal (click and drag), then hit Scan Selection in your Frequency Analysis window. This will update the Fourier Graph to show the Fourier Transformation of your entire signal at all selected times.
Let us take a minute to observe a few things here. First, our pitch is at 440 Hz. To observe this, notice that the loudest (tallest) peak lies just after 400 Hz (around 440).
Second, our pitch has very few harmonics, because it was computer generated. An acoustically generated 440Hz signal, such as a key on a Piano, would ring with harmonics of higher and lower frequencies. While it may appear as though we have harmonics, because there are spikes at other frequencies (such as 110 Hz), we will see in a minute that those frequencies are equally as prevalent in our Pure-Noise sample.
Third, notice that just after the 3-second mark, our A440Hz signal cuts off, leaving us with the background noise. In fact, let's break our signal into two parts and look at the Fourier Transform of each.
If we think about adding these two parts up, we can see that together, they make up the "Total" Transform shown previously. Keep in mind, we haven't separated the noise from the A yet - we merely have graphed the part of the signal that has both (left), and the part with only the noise (right). (We "separated the A from the noise").
Now that we can see what frequency we are trying to keep (440 Hz), and we can tell that we have very few harmonics (because the graph with our desired signal is almost identical to the graph without our desired signal, except for the 440Hz spike), we can try to apply something we already know about - a band-pass filter!
To do this, we are going to go to Effects -> Filter and EQ -> FFT Filter.... This will display a simpler Fourier Transform of our signal at a specific point in time - to view how it changes, go ahead and play the signal from the beginning!
Once you do that, click and drag the white points to create the filter you want - in this case, a Band-Pass filter around 440Hz. (filter pictured above)
Go ahead and apply that filter, and listen to the result! It should look something like this-
While this is a definite improvement, we can do better. Let's undo that change, select only our noise (the right side), and go into the Noise Reduction Process window (Ctrl + Shift + P). By clicking on Capture Noise Print (upper left), we can captured a sampled Fourier Transform of our selected noise. Then, click Select Entire File, to apply your Noise Reduction to the entire signal. By dragging the Noise Reduction and Reduce by sliders, you can adjust how much you reduce the noise by. Try to play with these settings yourself and listen to how they sound, then you can use my ideal settings to continue.
Notice how part of our noise is periodic in the frequency domain.
Now that you have appropriate settings, go ahead and apply the Noise Reduction. This works a little better, because it applies a band-reject filter to your signal that looks like your noise. Applying a band-pass filter by hand to anything but a pure frequency would be almost impossible, so this second technique can be used for anything from music background noise to speech background noise.
Congratulations! You just applied Fourier Transforms and filters to real-world applications! If you want, go ahead and try recording your voice and removing background noise from it, then proceed to part 2 when you are ready!
PART II
This exercise is going to involve a little more critical thinking. The file "Bach.mp3" contains a recording of Bach's First Cello Suite: Prelude (I was going to record my own version, but my neighbor complained)- except that after a couple bars, an irritating, high-pitched tone kicks in. Try to remove this (pure) tone, using either of the methods covered above, enjoy the sweet sounds of Bach's most well-known piece, and then consider the following:
-Which method would you prefer if the tone shifted frequencies throughout the song? -What about if the tone shifted volume throughout the song? -Or if the tone consisted of multiple frequencies? -Or if you didn't have access to a sample of the noise separate from the song? (hint hint) -Or maybe if the Bach Cello Suite was a soccer game, and the tone was the sound of thousands of Vuvuzelas?
For more information on that last one, and how you just solved a problem that real television broadcasting sound engineers face every year, go ahead and start here. 3 ways to filter vuvuzela noise at the world cup
Some possible filtering solutions to the Bach file can be found below:
Thank's for reading!


